Archiving Session Main Menu
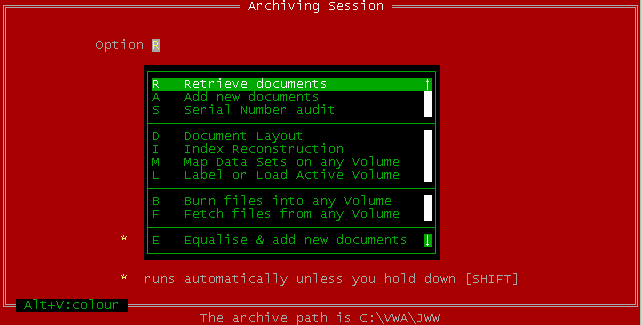
Menu Option R - Retrieve Documents
Retrieval criteria
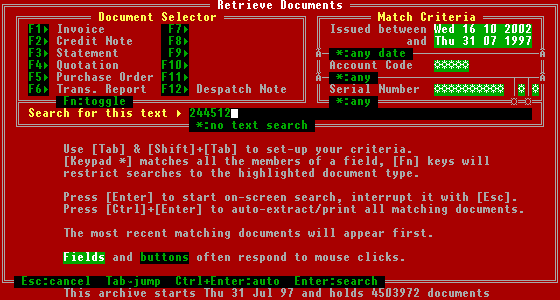
The Retrieve Documents dialog is the gateway to all of your archived documents included in the statistic at the foot of the screen. Follow the instructions in the lower part of the screen to set up your search criteria, if any, then press Enter (or click the button).
- The more precise your criteria, the narrower (and quicker) the search. However, don't give too much information: e.g. if you know the serial number there's no need to enter anything else.
- To clear all criteria quickly, escape to the Main Menu then press Esc again. To clear a single field, Tab into it and press Keypad *.
- All searches are run backwards within the Issued between dates, so the most recent documents will be found first. These dates are preset to today's date and the issue date of the oldest archived document.
- There are two unmarked single character fields to the right of the Serial Number field. These are flag characters relating to a Department Code, Reprint Indicator or similar if your main computer offers this information.
There are three search methods:
- Manually, by pressing Enter when the Search for this text field is empty.
- Text search, by pressing Enter when the Search for this text field is not empty.
- Automatic, by pressing Ctrl+Enter.
Manual searches
The program compares your criteria against its document tag index. When a match is found, it presents the tag details in the lower part of the screen, along with all other matches with the same issue date and document type, and the PC cursor moves to the Select field in the lower part of the screen:
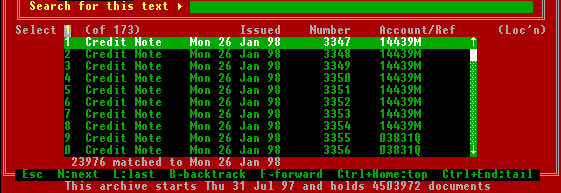
- Press Enter to view the selected (highlighted) document (after moving the highlight with the usual cursor movement keys, if applicable), or press the line number (1 to 9, 0) to view the document on that line.
- Press B to discard this list and continue searching backwards by date from this point.
- Press F to discard this list and continue searching forwards by date from this point.
- Press N to retrieve the next matching document.
- Press Esc to cancel the search.
Text searches
The program compares your other criteria against its document tag index as for a manual search, but retrieves any matching document immediately. The search continues if the specified text is not found in the document, until the tag index is exhausted, otherwise the program waits whilst you view the document.
- A single Space within the search text will match any number of consecutive spaces within the document.
- During the search, the program displays the number of matches (i.e. the number of documents searched for the text) and the date reached.
- Press Esc to cancel the search.
Automatic searches
The program searches the archive as for a Manual search or Text search as appropriate, but sends matching documents to a file or to the printer instead of waiting whilst you view them on screen. When you press Ctrl+Enter after setting up the criteria, you will be asked in the lower part of the screen to specify where the matching documents are to be sent:
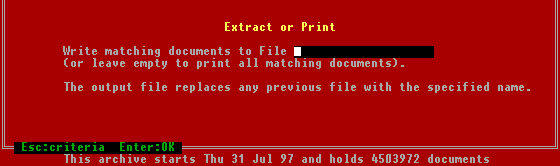
- Leave the File field empty to print all matching documents on the printer specified in the System Print to field of GO.EXE's Change Settings dialog.
- If the program successfully creates a file, any matching documents are written to it in the compressed BATCH data set format suitable for importing into another archive.
Document view
The program shows as much of the first page of the document as will fit on the screen, with the PC Cursor in the Page field on the bottom line. Use the hints at the foot of the screen to move around a large document:

- If the program was searching for text, each occurrence of the search text will be highlighted (but some or all may be off-screen).
- Press Fn to move directly to page n of the document.
- Press Alt+V to cycle through the available screen text resolutions.
- Press N to continue the search to the next matching document.
- Press L to reverse the search back to the previous matching document.
- Press Esc to return to the Manual Search Select screen. This will interrupt a Text Search (to resume the Text Search press N).
- Press PrtSc to print the whole document (you may continue viewing and/or searching for other documents without waiting for a print to finish).
- Press S to send the whole document to an external application.
- Press P to send or print a single page via the following pop-up dialog:
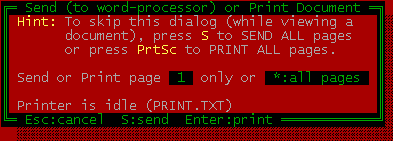
To send the document to an external application
When you activate the Send feature whilst viewing a document:
- The program writes the print image of the document (or selected page) to the text file SENDME.TXT in GO.EXE's Current Directory (replacing any previous file of the same name).
- The program executes the MS-DOS batch file SENDIT.BAT, if found in GO.EXE's Current Directory, passing the name of the text file (SENDME.TXT) as the first parameter and the two characters comprising Document Type and Schema Number from the Document Tag as the second parameter.
This sample SENDIT.BAT batch file displays the parameters passed from GO.EXE inside an MS-DOS box:
@echo off
@echo File %1 is document type %2
pause
This one-liner launches a Notepad window displaying the document:
notepad %1
This one-liner might launch MS-Word with a document template determined by the document type (the template would underlay the text with the pre-printed stationery image):
\msoffice\winword\winword.exe /tC:\GO\FAX%2.DOT
A more flexible method, however, would be to have a macro in MS-Word which reads in newly generated SENDME.TXT files.
Menu Option S - Document Serial Number Audit
Provided you assign serial numbers to documents in ascending numeric sequence, and the Document Issue Date in the Document Tag is the date the serial number was assigned, the program can alert you to any missing serial numbers. Select the Main Menu option S to obtain this dialog:
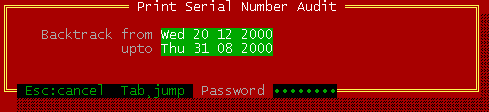
The program suggests printing its audit from today's date back to the date the last run ended. Change these dates if you wish, then enter the Daily Password to start processing. This is an example of the report produced:
Archived Document Serial Number Audit Mon 18 Sep 00 12:03:16
--- Issued -- Type  Qty      Low      High  Remarks
Thu 31 Aug 00  IB     8    36414     36421
Thu 31 Aug 00  CB     2     3728      3729
Thu 31 Aug 00  S      1        0         0
Wed 30 Aug 00  IB     1    36413     36413
Wed 30 Aug 00  CB     2     3726      3727
Tue 29 Aug 00  IB    10    36403     36412
Fri 25 Aug 00  IB     1    36402     36402
Wed 23 Aug 00  IB     2    36400     36401
Tue 22 Aug 00  IB     7    36393     36399
Tue 22 Aug 00  CB     1     3725      3725
Mon 21 Aug 00  IB     4    36389     36392
Mon 21 Aug 00  CB     1     3724      3724
Mon 21 Aug 00  S      1        0         0
Fri 18 Aug 00  IB     1    36388     36388
Thu 17 Aug 00  IB    10    36378     36387
- Press Esc to cancel the report at any time.
- Scan down the Remarks column for any messages, such as 1 missing at 56849, and investigate as necessary.
- The first character in the Type column is the Document Type (e.g. I for Invoice) within the Document Tag.
- The second character, if any, in the Type column is Flag 1 (e.g. a Department Code) within the Document Tag, and is present when each distinct value has its own Serial Number series.
- The Qty column gives the number of distinct serial numbers found with the same issue date (duplicated serial numbers are taken to be from duplicate images of the same document). In this instance the Document Type S (Statement) does not have a serial number, so only the one distinct value (0) is reported regardless of how many statements were archived.
Menu Option D - Document Layout
The LINEUP file (in GO.EXE's working directory) holds the information required to reprint each of your document styles correctly.
- The archived print image of a document does not define the size of a page. It simply starts at the top left corner and extends as far as necessary horizontally and vertically. If the originating computer used vertical tabs, the image does not define where the stops occur.
- If the application doesn't find the LINEUP file, it creates it with your customised style records (which will usually assume the original stationery is to be used).
You may wish (or need) to reprint your documents onto a different paper size to the original stationery. To check or amend the document layout, select the Main Menu option D to obtain this dialog:
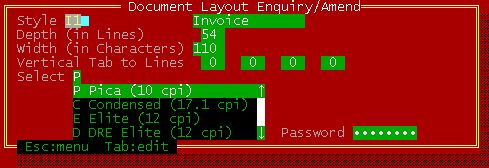
- Style
- Enter the two characters comprising Document Type and Schema Number from the Document Tag. Typical Document Types are I (Invoice), C (Credit Note), Q (Quotation), D (Despatch Note), P (Purchase Order), S (Statement). The Schema Number (usually 1) allows for possible redesigns of your stationery during the lifetime of the archive. Then press Enter to view the the current settings for this style.
Alongside the Style field is its 14-character description field. - Depth (in Lines)
- Standard dot-matrix spacing is six lines per inch, so this field should normally be set to the paper depth in inches multiplied by six.
- Width (in Characters)
- The value of this field has no effect on the printing of documents. Rather, it sets the right hand margin for viewing documents on screen.
- Vertical Tab to Lines
- Four fields for Vertical Tab stop line numbers, in ascending sequence, if required. Fortunately, printers requiring vertical format tapes are now obsolete.
- Select P/C/E/D
- Standard dot-matrix spacing is ten characters per inch (Pica). The Condensed option allows you to reprint a full width 132-character document on an eight inch wide Epson-compatible printer.
- Password
- Enter the Special Password to write this style record back to the LINEUP file.
Menu Option L - Label or Load Active Archive Volume
Use this option to nominate the Active Master Volume (and its backup). Main Menu Option A Add new documents writes all new documents into the currently nominated Active Volume.
- If this option cannot find the nominated volume, it creates it in the Archive Path. The Active Backup Volume must have the same volume number as the Active Master Volume, so you should create the pair together. The program creates volumes only in the Archive Path directory, so one of them should be moved to separate media (and its path entered into the file
VWAPATH.INIif not there already). - Secondary Archive Stations (those updated by the Equaliser) do not require an Active Backup Volume. The Primary Station provides backup.
- Even though modern media capacities are gigabyte magnitude, you should consider creating a new active volume when the current volume reaches 100 megabytes or so. Splitting the archive into manageable chunks gives you more flexibility with no discernible effect on performance.
- When you change the nominated Active Master Volume of the Primary Archive Station any Secondary Archive Stations updated by equalising with it will need to be told of the change.
- If you are using removable media, check that it is write-enabled.
You should take care to ensure that all your Archive Volumes are uniquely numbered. The recommended format for the Volume Number is yy.nn where yy is the current year (e.g. 01 for 2001) and nn is the sequence number this year (01=first). The corresponding MS-DOS file name will be VOLyynnt.VWA where t is the type (M=Master, B=Backup).
All volumes other than the Active Master Volume and its Backup are closed, i.e. used for retrieval purposes only, unless you re-nominate one of them as the Active Master Volume. You cannot change its volume number (don't try to rename it!) but provided it is a Master Volume it can be successfully re-nominated.
Nominating the Active Volume
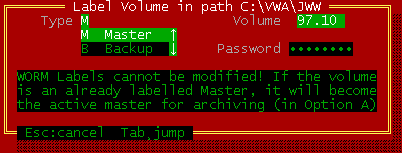
Select Main Menu option L to obtain the above dialog, showing the current Active Master Volume number in the Volume field. The cursor is in the Password field. Tab into the Volume field to enter your nominated volume number, then back to Password and enter the Special Password. The program attempts to create (or re-nominate) the volume. This should take less than one second. Possible outcomes are:
- A Master Volume was successfully nominated.
The program either returns to the Main Menu displaying the message Volume was already labelled & is now the active Master or pops-up the Label Backup Volume dialog below. - A Backup Volume was created.
The program returns to the Main Menu displaying the message Volume is now labelled. - A non-master volume label was already present.
The program returns to the Main Menu with a beep displaying the message Volume is an already labelled non-Master. - A failure occurred. Pres Esc until you reach the Main Menu.
Creating the paired Backup Volume
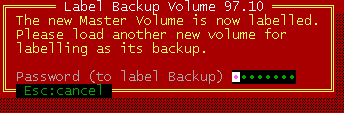
The above dialog pops-up when a new Master Volume is successfully created at a Primary Archive Station, as you will need a Backup Volume with the same volume number. Change the media if it is removable. Enter the Special Password. The program attempts to create the volume. Possible outcomes are:
- A Backup Volume was created. The program returns to the Main Menu displaying the message Volume is now labelled.
- A volume label was already present. The program returns to the Main Menu with a beep displaying the message Volume is already labelled!
- A failure occurred. Pres Esc until you reach the Main Menu.